Okay, Who Doesn’t Like Marshmallows?
Is there anything that brings out the inner child in every one of us? Memories of toasted marshmallows by the campfire or eating s’mores in the summertime often come up anytime we mention marshmallows. We have a few stories of our own involving marshmallows.
Louise Hay on Marshmallows: When I was a little girl, I won a very unusual contest. The contest involved seeing how fast you could get a marshmallow attached to a string into your mouth. This meant you had to have a very strong tongue. Well, I did because I won the contest every time! When Heather heard this story, she decided we needed to make some healthy marshmallows and try this contest ourselves!
Heather Dane on Marshmallows: When I decided to make my first batch of marshmallows a couple of years ago, I didn’t have an automatic mixer. I figured I could use my Braun hand blender with whisk attachment instead, which required me to hold the “on” button down the whole time in order to make it work. Around the bowl, I had placed a tea towel to keep the marshmallow from splattering. This makeshift solution was going as well as it could until my cat, Willie, came in from the enclosed patio with a bee following him. He was chasing the bee and I began to worry that he’d get stung. I called out for my husband, Joel, who was likely ignoring me thinking I was going to ask him to do some chore. As I looked over at Willie, I inadvertently lifted the whisk out of the bowl, but was still pushing the on button . . . which resulted in the tea towel winding around the running whisk and marshmallow covering every surface of the floor, stove and cabinets. Joel came down once it was all cleaned up. I now have an automatic stand mixer with a splatter-proof bowl. It’s amazing how effortless making marshmallows is now!
Our taste testers said that this recipe was so good that they wanted to take a bath in the marshmallow cream. It makes a wonderful whipped topping. We also made suggestions for making more traditional homemade marshmallows that are moister, healthier and tastier than the store bought version.
We hope you enjoy both versions of this recipe and perhaps you will have your own homemade marshmallow stories to tell for years to come.
Heavenly Homemade Marshmallow Whipped Topping
These will not be firm at room temperature. You can refrigerate or freeze this and you will still have a nice, whipped cream type consistency. It may appear to form in a pan, but it actually loses form at room temperature and is easy to scoop and use as a whipped topping or frosting substitute for cake.
Preparation Time: 10 to 20 minutes
Serves: 10 to 12 people
- 1/4 cup neutral bone broth (Neutral bone broth has very little flavor and is made with just bones, water and apple cider vinegar. If you don’t have any on hand, you can use 2 tablespoons unflavored powdered gelatin if you don’t have any neutral broth.)
- 1/2 cup water
- 1 cup raw honey
- 1 teaspoon sea salt
- 2 teaspoons vanilla extract
Optional Spices
These spices are what pushed the marshmallow cream over the top to “heavenly” and “otherworldly” for our recipe testers. They ground the sweetness of the marshmallow cream so that it’s not too sweet and does not trigger cravings. If you want, you can make the recipe with the above ingredients, whip it up, taste, then add these and see what you think.
- 1/4 teaspoon cinnamon
- 1/4 teaspoon cardamom
- 1/4 teaspoon fenugreek
- 6 to 10 drops of Urban Moonshine Citrus Bitters (These are organic herbs that add a nice flavor and enhance digestion. You may be able to get these at your local health food store, liquor store or online at Amazon.com or iHerb.com).
Instructions for Heavenly Marshmallow Whipped Topping
You can use any size large bowl to store the marshmallow cream, preferably one with a lid. baking pan you have on hand, although this recipe volume best fills either a bread loaf pan (approximate size: 9″ x 5″ x 2 1/2″) for thick marshmallows or a square baking pan (approximate size: 9” x 9 “) for slightly thinner marshmallows.
If you are not using a silicone pan, it helps to get wax paper or parchment paper and rip out two sheets that are just a few inches longer than the bottom of your baking pan. You will put the sheets in plus sign (+) where one is lengthwise in the pan and one sheet goes across the width of the pan. This is so that you can lift the paper out of the pan and easily get the marshmallows out when they are ready. Put a thin layer of butter, ghee or coconut oil over the paper to keep the marshmallow from sticking.
If you have a silicone bread loaf pan or silicone shapes, like hearts, squares or a silicone standard sized muffin pan, these all work beautifully. Silicone is flexible, so you can just grease the pan with no need to use wax paper or parchment paper. Instead, just run a butter knife around the edges to loosen up the finished marshmallows and push them out from the bottom.
- Add honey, water, vanilla and sea salt into a saucepan and heat on medium high until the honey gets to 220° F when measured with a candy thermometer (you can also use a meat thermometer that goes up to 220° F). Typically, when it gets to this stage, you are seeing big bubbles as the honey, water, vanilla and salt mixture boils and you may notice that the smell changes just a bit or you become aware of the smell. We have made this without a thermometer and just used the visual and olfactory senses and done pretty well with this before. In the beginning, you may want the reassurance of a candy or meat thermometer, just to confirm that it’s where you want it to be. The mixture will still look golden colored, like the honey. This will change to white when you mix it!
- Pour this mixture into your mixing bowl. If you need to use powdered gelatin because your bone broth was not gelled enough, add it in with the warmed mixture and let it sit and cool down for 10 to 15 minutes.
- Once cooled a bit, turn on your mixer. A stand mixer is the easiest because you just turn it on and let it go. You can also use a hand mixer. It helps if you have a splatter protector over your bowl, although you could use a tea towel if you are careful and pay attention while mixing (so you don’t have a mishap like Heather did with her tea towel!).
- You will know the marshmallow is done when it gets thick and white. It almost stands up by itself when you make a peak with it. This may take about 7 to 10 minutes.
- Now taste. See if you like it as is or if that feels too sweet for you. We like to see if there’s energy going right up to the head after tasting. If that feeling happens, it’s likely too sweet! This is a good sign to add some spices. You could start first by adding the cinnamon, mix it in and taste. If you are feeling adventurous, add the rest of the spices. The bitters are optional. They aid digestion and add a nice, balancing flavor. You could also add two drops of either lemon juice, squeezed orange juice or a drop of either orange or lemon extract if you don’t have citrus bitters on hand and want to try out some new taste sensations. Mix all spices thoroughly and you’re ready to transfer to your pan!
- Pour the mixture into a large bowl and cover with a lid, if you have one. A rubber spatula can help get out all the goodness, unless you want to leave a little there for licking the mixer and pan.
- Store in your refrigerator for up to 4 days or in your freezer for up to a month. Even if you freeze this marshmallow cream, it will still be soft and ready to serve within a few minutes of removing it from the freezer. **Keep in mind that if you make this with unflavored gelatin, it will get solid in the refrigerator. Take it out an hour or two before serving to get soft like whipped cream. If you’re in a hurry, put it in an oven-safe baking dish and heat it up in the oven on a very low setting (around 180 degrees F). You can alternatively put it in a saucepan and heat on your stove top on low.
Serving Suggestions for Heavenly Marshmallow Whipped Topping
- Use as a topping for ice cream.
- Serve over berries or sliced bananas
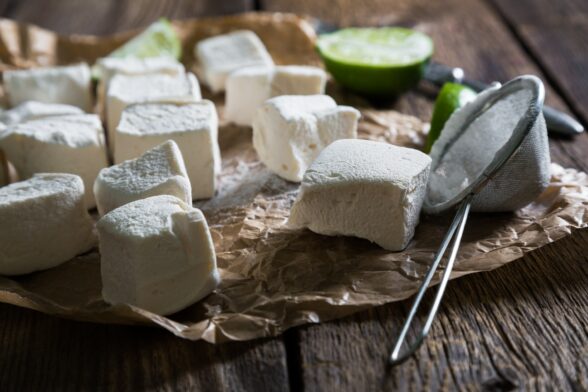
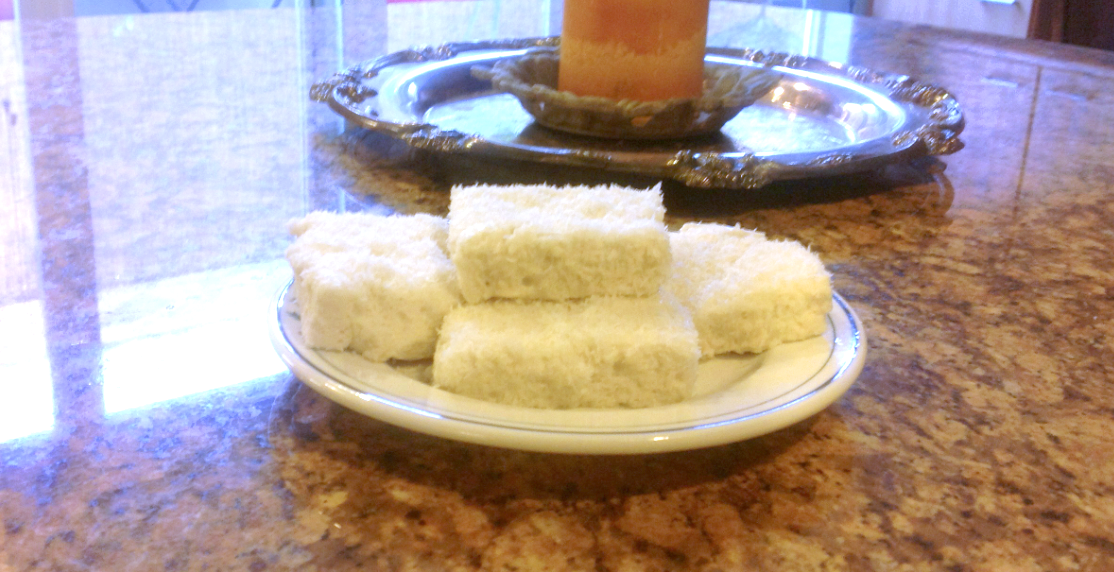
Homemade Marshmallows
 Preparation Time: 10 to 20 minutes to prepare and 4 hours to set.
These will be firm at room temperature and closer to store bought marshmallows, except they will be moister in texture.
Serves: 12 people
Ingredients for Marshmallows
- 6 tablespoons neutral bone broth (make sure it is very gelled. It should have little movement when you shake the chilled bone broth that has been in the refrigerator for at least 24 hours. If it’s not that gelled, add 1 tablespoon of powdered gelatin. If it’s total liquid, add 2.5 tablespoons powdered gelatin)
- 1 cup raw honey
- 2 teaspoon vanilla extract
- 1 teaspoon sea salt
- 2 tablespoons powdered beef gelatin
Optional Spices
These spices are what pushed the marshmallow cream over the top to “heavenly” and “otherworldly” for our recipe testers. They ground the sweetness of the marshmallow cream so that it’s not too sweet and does not trigger cravings. If you want, you can make the recipe with the above ingredients, whip it up, taste, then add these and see what you think.
- 1/4 teaspoon cinnamon
- 1/4 teaspoon cardamom
- 1/4 teaspoon fenugreek
- 6 to 103 drops of Urban Moonshine Citrus Bitters (These are organic herbs that add a nice flavor and enhance digestion. You may be able to get these at your local health food store or iHerb.com).
Optional Coloring and Toppings
- Coloring – you can use natural food dyes to color these if you are making Easter peeps for kids or you want to add pizazz for a party.
- Be creative and have fun with your own inventions! After the marshmallows are put into the pan, some people sprinkle theirs with camu camu powder (a natural source of vitamin C and pink in color), raw cacao, cinnamon, cloves, fennel, ground pumpkin seeds, shredded coconut or whatever catches their fancy!
Instructions for Marshmallows
- Follow all of the instructions for the Heavenly Marshmallow Cream above, except you will not be using water for this recipe and once you add the bone broth, honey, vanilla and sea salt to your mixing bowl, add the 2 tablespoons powdered gelatin, mix it in just a bit and allow the mixture to sit as noted in the marshmallow cream recipe (about 10 minutes). Then proceed with mixing it up as noted in the marshmallow cream recipe (about 10 minutes in the mixer).
- Once the marshmallows are finished and you have added any spices you want to include, leave everything in the mixing bowl and decide whether you want to use any optional coloring ingredients. If you want to use the elderberry tincture and/or tart cherry juice concentrate, add those into the mixing bowl and mix in thoroughly before transferring to your pan. If you want to make Easter Peep-style treats, you can get a pastry bag and tips (used in cake decorating) and pipe Peep-shaped treats.
- If you want to add any other ingredients to top your marshmallows, these can be added after you transfer the marshmallows to the pan (e.g., camu camu powder, raw cacao, shredded coconut, etc.).
- Once your marshmallows are in the pan (or piped into Peep shapes) and sprinkled with optional ingredients, you can leave them on your countertop to set. It will take about 5 hours for them to completely set. At this point, you can slice them and remove them from the pan to serve.
- Store in your refrigerator for up to 7 days and in your freezer for longer periods.
Serving Suggestions
- Eat as is.
- Dip in liquid chocolate for a fancy presentation.
- Serve on top of a healthier s’mores recipe.
- Serve with sliced strawberries or bananas.
- Tie one to a string and do Louise’s marshmallow trick, trying to get the marshmallow up into your mouth! There are many websites and books with kid’s games involving marshmallow races like this. Have fun!
Latest posts by Heather Dane (see all)
- Listening to Your Gut and Heart - April 24, 2019
- Breaking Through Resistance: Following Creative Energy - April 16, 2019
- Love Intuition: Follow the Energy to True Love - April 10, 2019